

How-to: Read a Knitting Chart
A knitting chart is a visual way of showing a stitch pattern. Each square represents one stitch or action, with symbols used for techniques such as knit stitches, yarn overs and decreases.
Charts are always read from the bottom upwards, but the direction you read each row depends on whether you are knitting flat or in the round.
This guide will come in particularly handy if the 2026 Mystery Advent will be your first venture into a Knit-A-Long project. Chart reading is optional, but learning the basics gives you another useful way to follow the pattern.
Top Tip: Place a ruler, bookmark or straight piece of card beneath the row you are working on. Move it up as you complete each row to help you keep your place and avoid accidentally jumping ahead.
What You'll Need:
-
Your knitting pattern and chart
-
The chart’s symbol key
-
Knitting needles and yarn
-
A ruler, bookmark or other straight edge
-
Steps:
-
Check the symbol key before beginning. There is no internationally standardised set of knitting-chart symbols, so the meanings can vary between designers and publishers.
-
Begin at the bottom-right corner of the chart.
-
When knitting a flat piece, read odd-numbered Right Side rows from right to left.
-
Read even-numbered Wrong Side rows from left to right. This means your eyes travel back and forth across the chart in the same direction as your knitting.
-
Work each square in order, following the action shown in the symbol key. An empty square might represent a knit stitch, while other symbols may indicate a yarn over, decrease or another technique.
-
Remember that some symbols require a different action when worked on a Wrong Side row. Always follow the instructions given in the pattern’s key.
-
Continue working upwards through the chart, moving your ruler or marker after each completed row.
-
When knitting in the round, begin at the bottom-right and read every row from right to left, as you are always working from the Right Side.
-
For colourwork charts, each square usually represents the colour used for that stitch. These charts often keep the stitch itself simple so you can concentrate on following the colour pattern.
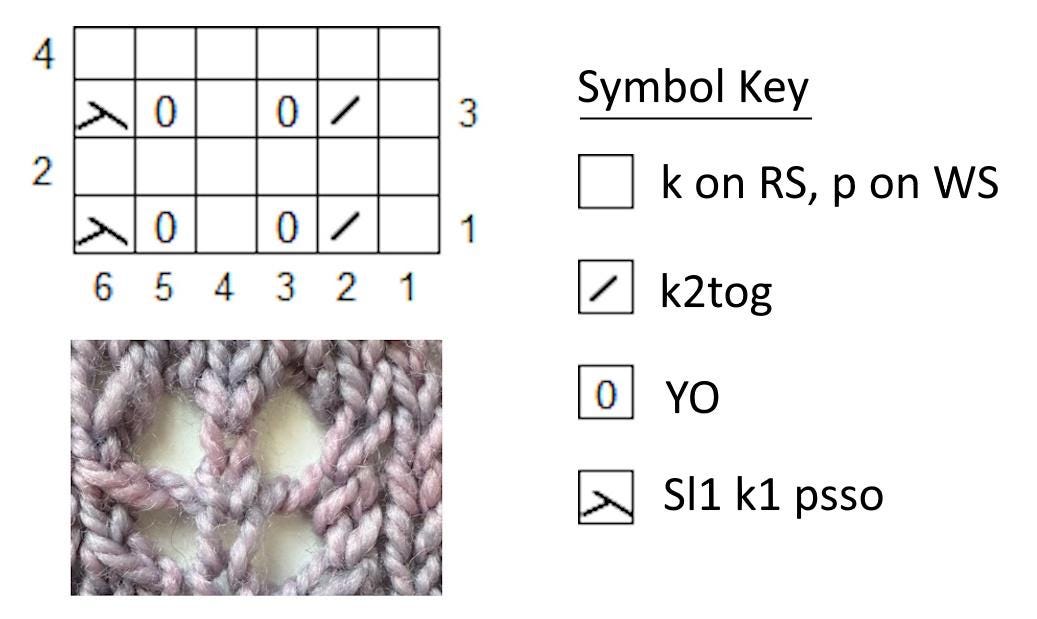
📸 In the example chart, Row 1 begins at the bottom right and is read from right to left. Row 2 is then read back from left to right. The arrangement of yarn overs and slanting decreases on the chart matches the pattern of holes and stitches in the finished knitting.
Fancy learning this with me? My one-to-one Knitting & Crochet Lessons are gentle, practical and completely judgement-free, whether you’re an absolute beginner or simply dusting off old skills.