
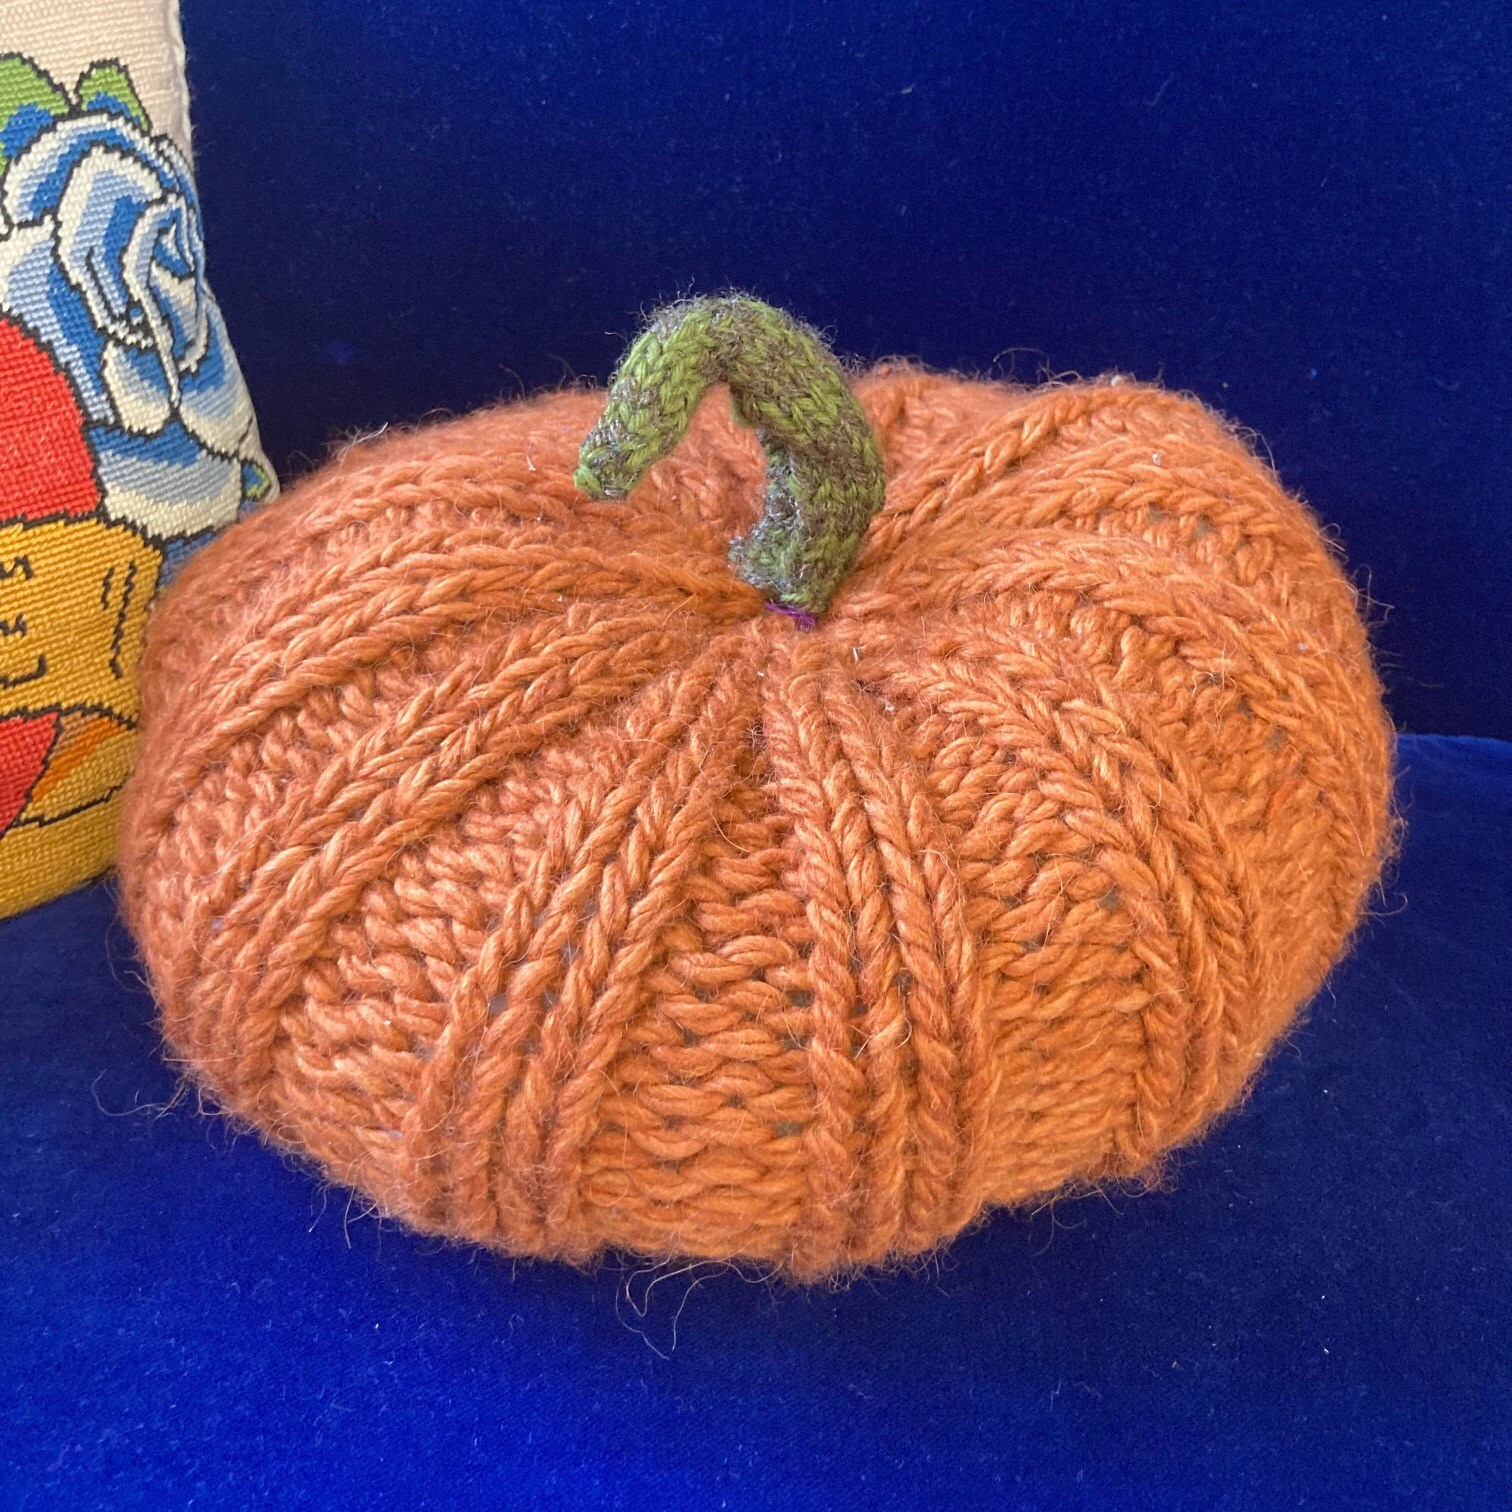
Knitted Pumpkin
a hand knitting pattern by Suzi Ashworth.
Level: Easy/Beginner.
To make this pumpkin you will need:
- 150g of orange/brown yarn. I used 3 x 50g balls of orange/brown toned dk and aran yarns held together to create a super chunky weight yarn. 150g of super chunky weight yarn in an orange/brown colour will also work.
- 20g scraps of brown/green DK yarn for the stalk.
- 10mm knitting needles, either straight or circular.
- 4.5mm double pointed needles or straight needles.
- 1 pipe cleaner or piece of craft wire (optional).
- Tapestry/wool sewing needle.
- Scissors or snips.
- Toy stuffing – 100g or more.
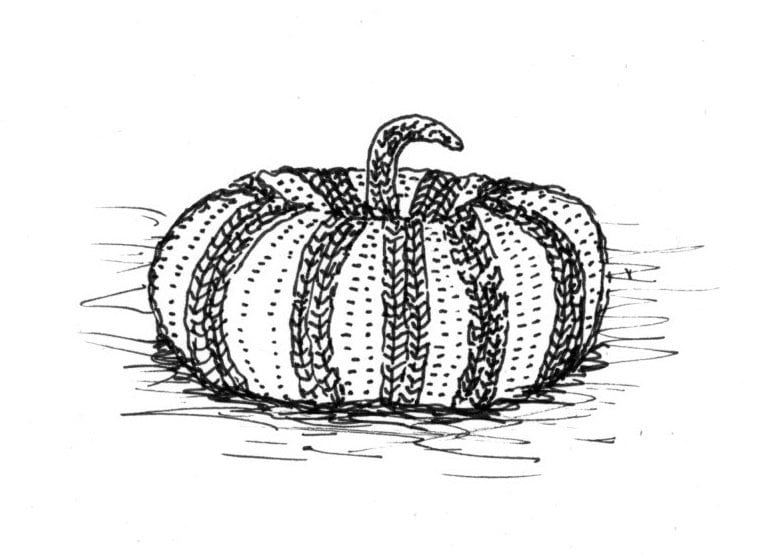
Pumpkin Body:
I used 3 strands of orange/brown DK/Aran weight yarn held together to create a super chunky weight yarn with slightly different orange tones, but you can also use a single strand of super chunky weight yarn in a mottled/variegated colourway to create the same effect.
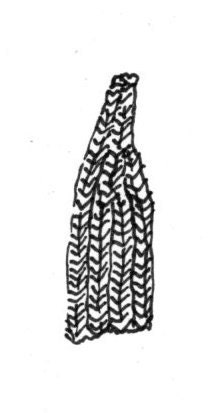
Using your 10mm knitting needles cast on 54 stitches. I used the basic/simple cast on method that most beginners learn first.
Row 1: purl 1, knit 2, purl 2, knit 2, purl 2, continue in established 2 x 2 rib pattern until 1 stitch before end of row. Knit 1. Turn work.
Row 2: Purl 1, knit 2, purl 2. continue in established 2 x 2 rib pattern until 1 stitch before the end of the row. Knit 1.
Repeat these 2 rows 17 more times.
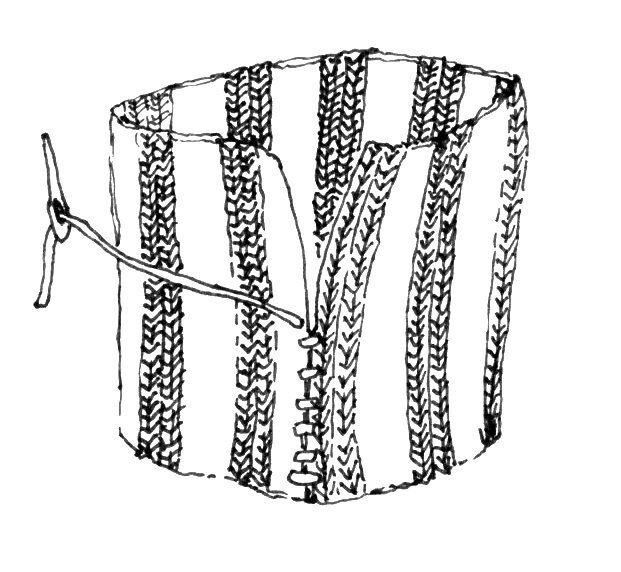
Cast off all stitches & fasten using the method of your choice. I used the traditional/standard method that most beginners learn. Leave a tail (loose piece of yarn) at least 50cm long before cutting the yarn.
Take a large sewing needle (blunt ended tapestry/wool needle or a plastic wool needle), thread it on to the 50cm tail that you have just cut. Then fold your rectangle so that the 2 shorter edges are touching. Using a simple whip stitch join the edges so that the rectangle becomes a tube. Fasten off. As a guide for where to place your stitches, the single purl or knit stitch at either end of your rectangle are there to be sewn in to, so that when you turn your work inside out the tube appears to carry the k2 p2 rib pattern all the way round. Don't pull the yarn too tight as you will need the fabric to stretch a little when you stuff the pumpkin.
Taking another 50/60 cm piece of yarn, sew a simple running stitch around the bottom of the tube. Pull both ends to gather the bottom tightly and make a knot to secure your gathered fabric. The tails of the piece of yarn can be tucked inside the pumpkin to hide them (they will be used later so don't cut them off).
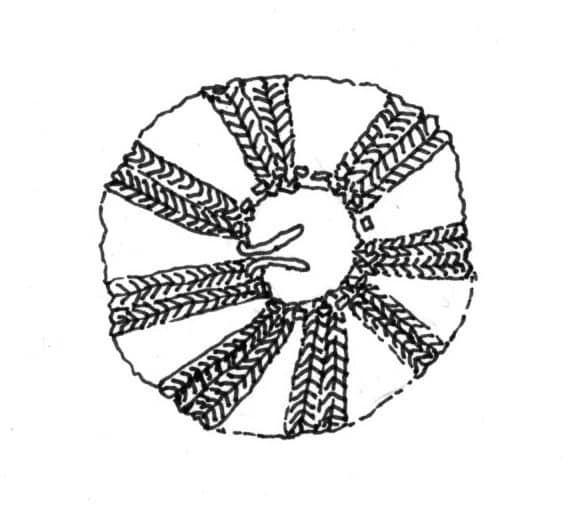
Stuff your pumpkin. I used approximately 100g of toy stuffing, but if you want a fatter/taller pumpkin then add more.
To close the top of the pumpkin, again sew a running stitch around the top edge of the tube and pull to gather and close it. Before you knot it, reach inside and pull the tail from gathering the base up to the top. I knotted the tail from the bottom together with the tail from the top to control the height/depth of my pumpkin. If you want a really round pumpkin you don't have to do this, but I like the squished/patty pan look. The leftover thread can be tucked inside the stalk so you don't need to cut it off.
Stalk:
I made a circular tube for the stalk but if you are unfamiliar with knitting in the round you can knit a rectangle and sew the edges together to make a tube.
Hold 1 strand of brown and 1 strand of green DK yarn together to create a mottled effect stalk.
Rectangle method: Cast on 8 stitches using 4.5mm straight needles. Knit in stockinette stitch (knit on right side, purl on reverse side) until you have a piece around 13 cm long. Bind off leaving a tail. Fold the fabric lengthwise so that the knit stitches are facing in. Sew along the long edge using basic whip stitch to create a long thin tube, then gather the top of your tube together. Turn this tube inside out so that your smooth knit stitches are now on the outside.
Tube method: Cast on 8 stitches using dpn's and join in the round. Knit 15 rounds to form a tube about 8-9 cm long before starting to reduce stitches. Round 16: k2, k2 together, k3. Rnd 17-18: Knit. Rnd 19: K3, k2tog, K2. Rnd 20-21: knit Reduce twice more in the same pattern as above until you have 4 stitches left. Using your sewing needle gather the remaining 4 stitches together to secure the end before fastening off.
Tuck any loose threads inside this tube to hide them, then insert a pipe cleaner or craft wire so that you can bend the stalk to create a 'natural' effect. Attach the stalk to the centre top of the pumpkin body, tucking any excess thread inside the stalk to pad it out a bit before fastening off.
If your pumpkin looks lumpy, fatter or different than mine in any way remember that in nature each pumpkin is slightly different!
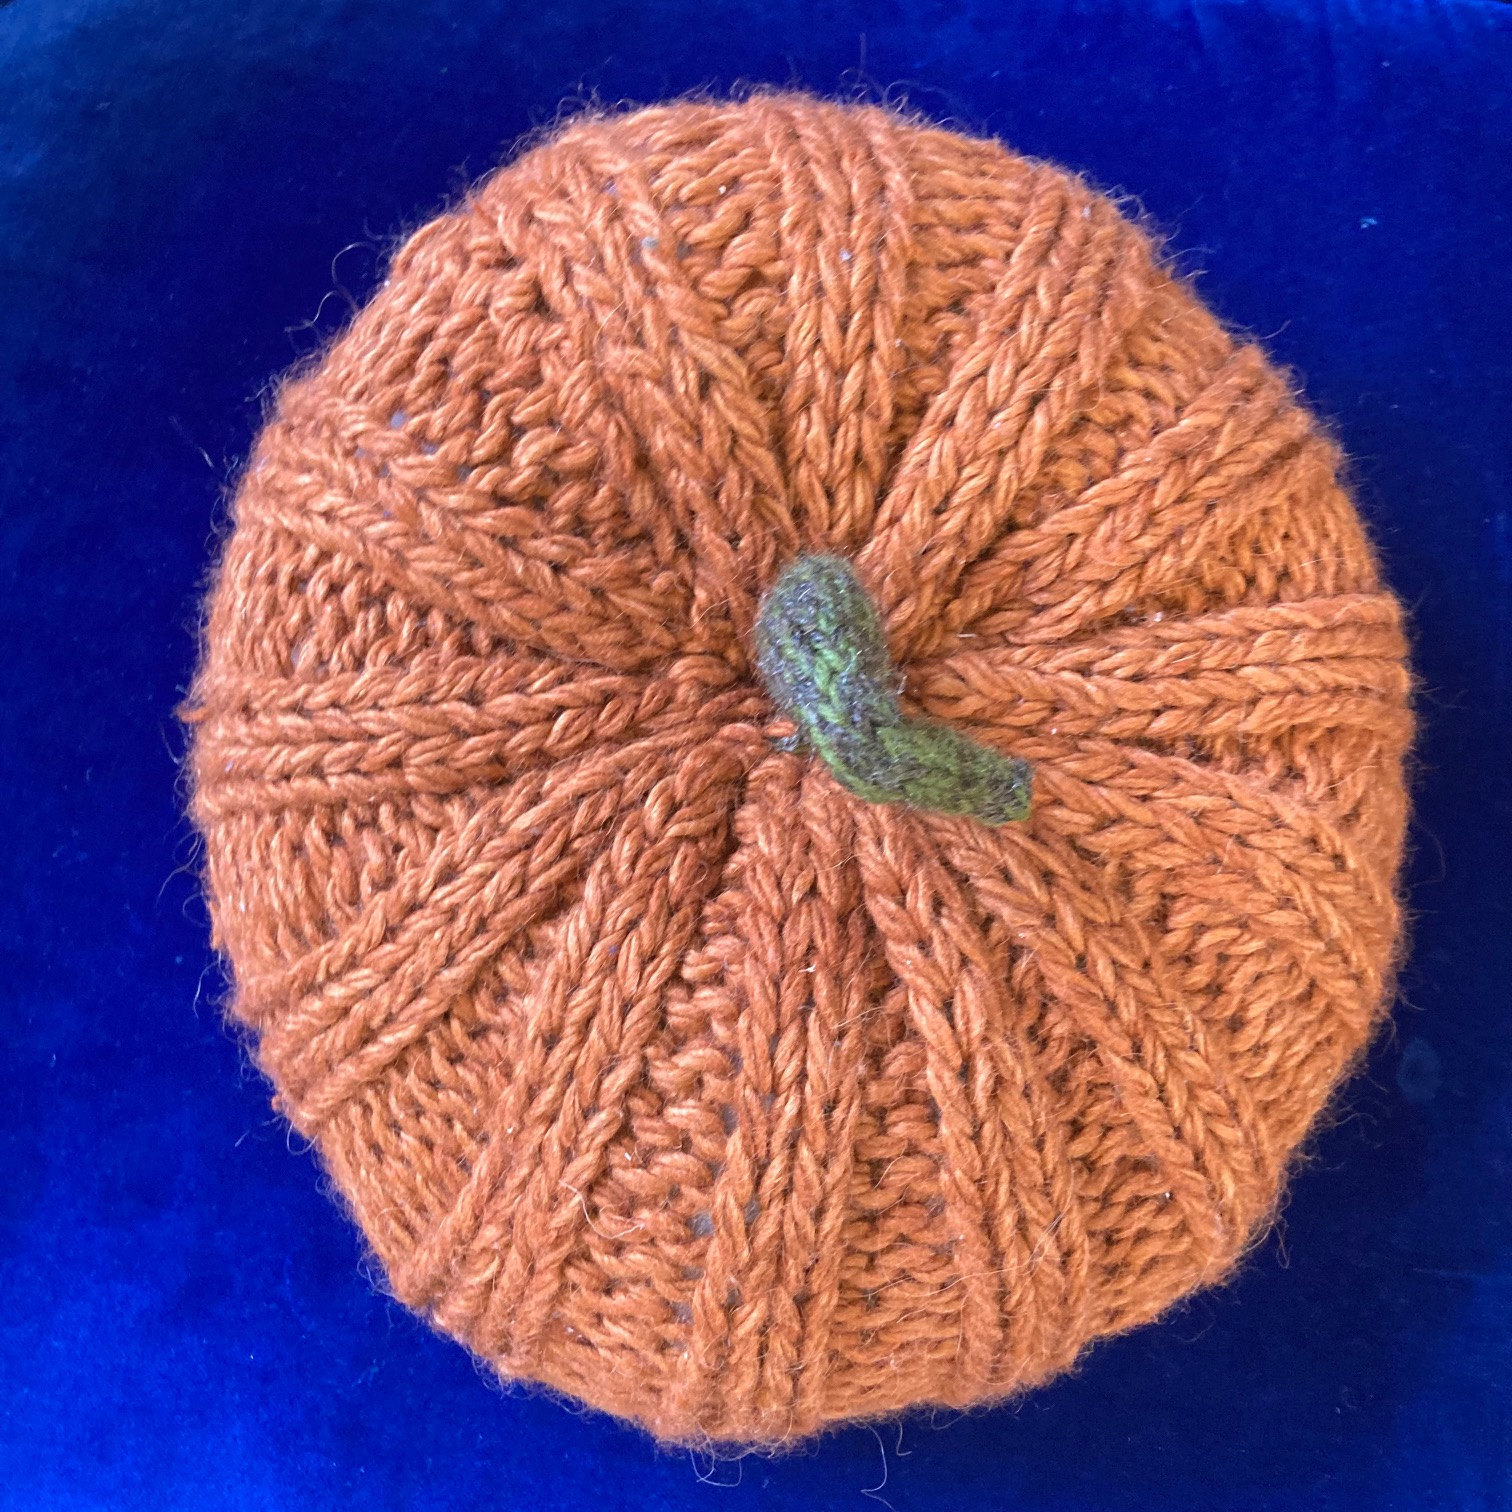
Tip: I used brown felt to cut shapes and letters which I attached to one of our pumpkins to make it look like it had been carved!