
This pattern is written using U.K. Crochet terms.
Sizes: S, M, L. Cardigan is designed to be oversized and worn with 8 to 25cm positive ease. See Chart 1 for sizing guide which covers Uk sizes 8-20 approx.
Skill level: Easy. If you can make a granny square you can do this. It uses chains, trebles, and some double crochet stitches. A Magic Ring is optional as an alternative is provided and there is a Techniques section to help you learn new crochet methods. There are crochet charts and diagrams for every stage along with written instructions.
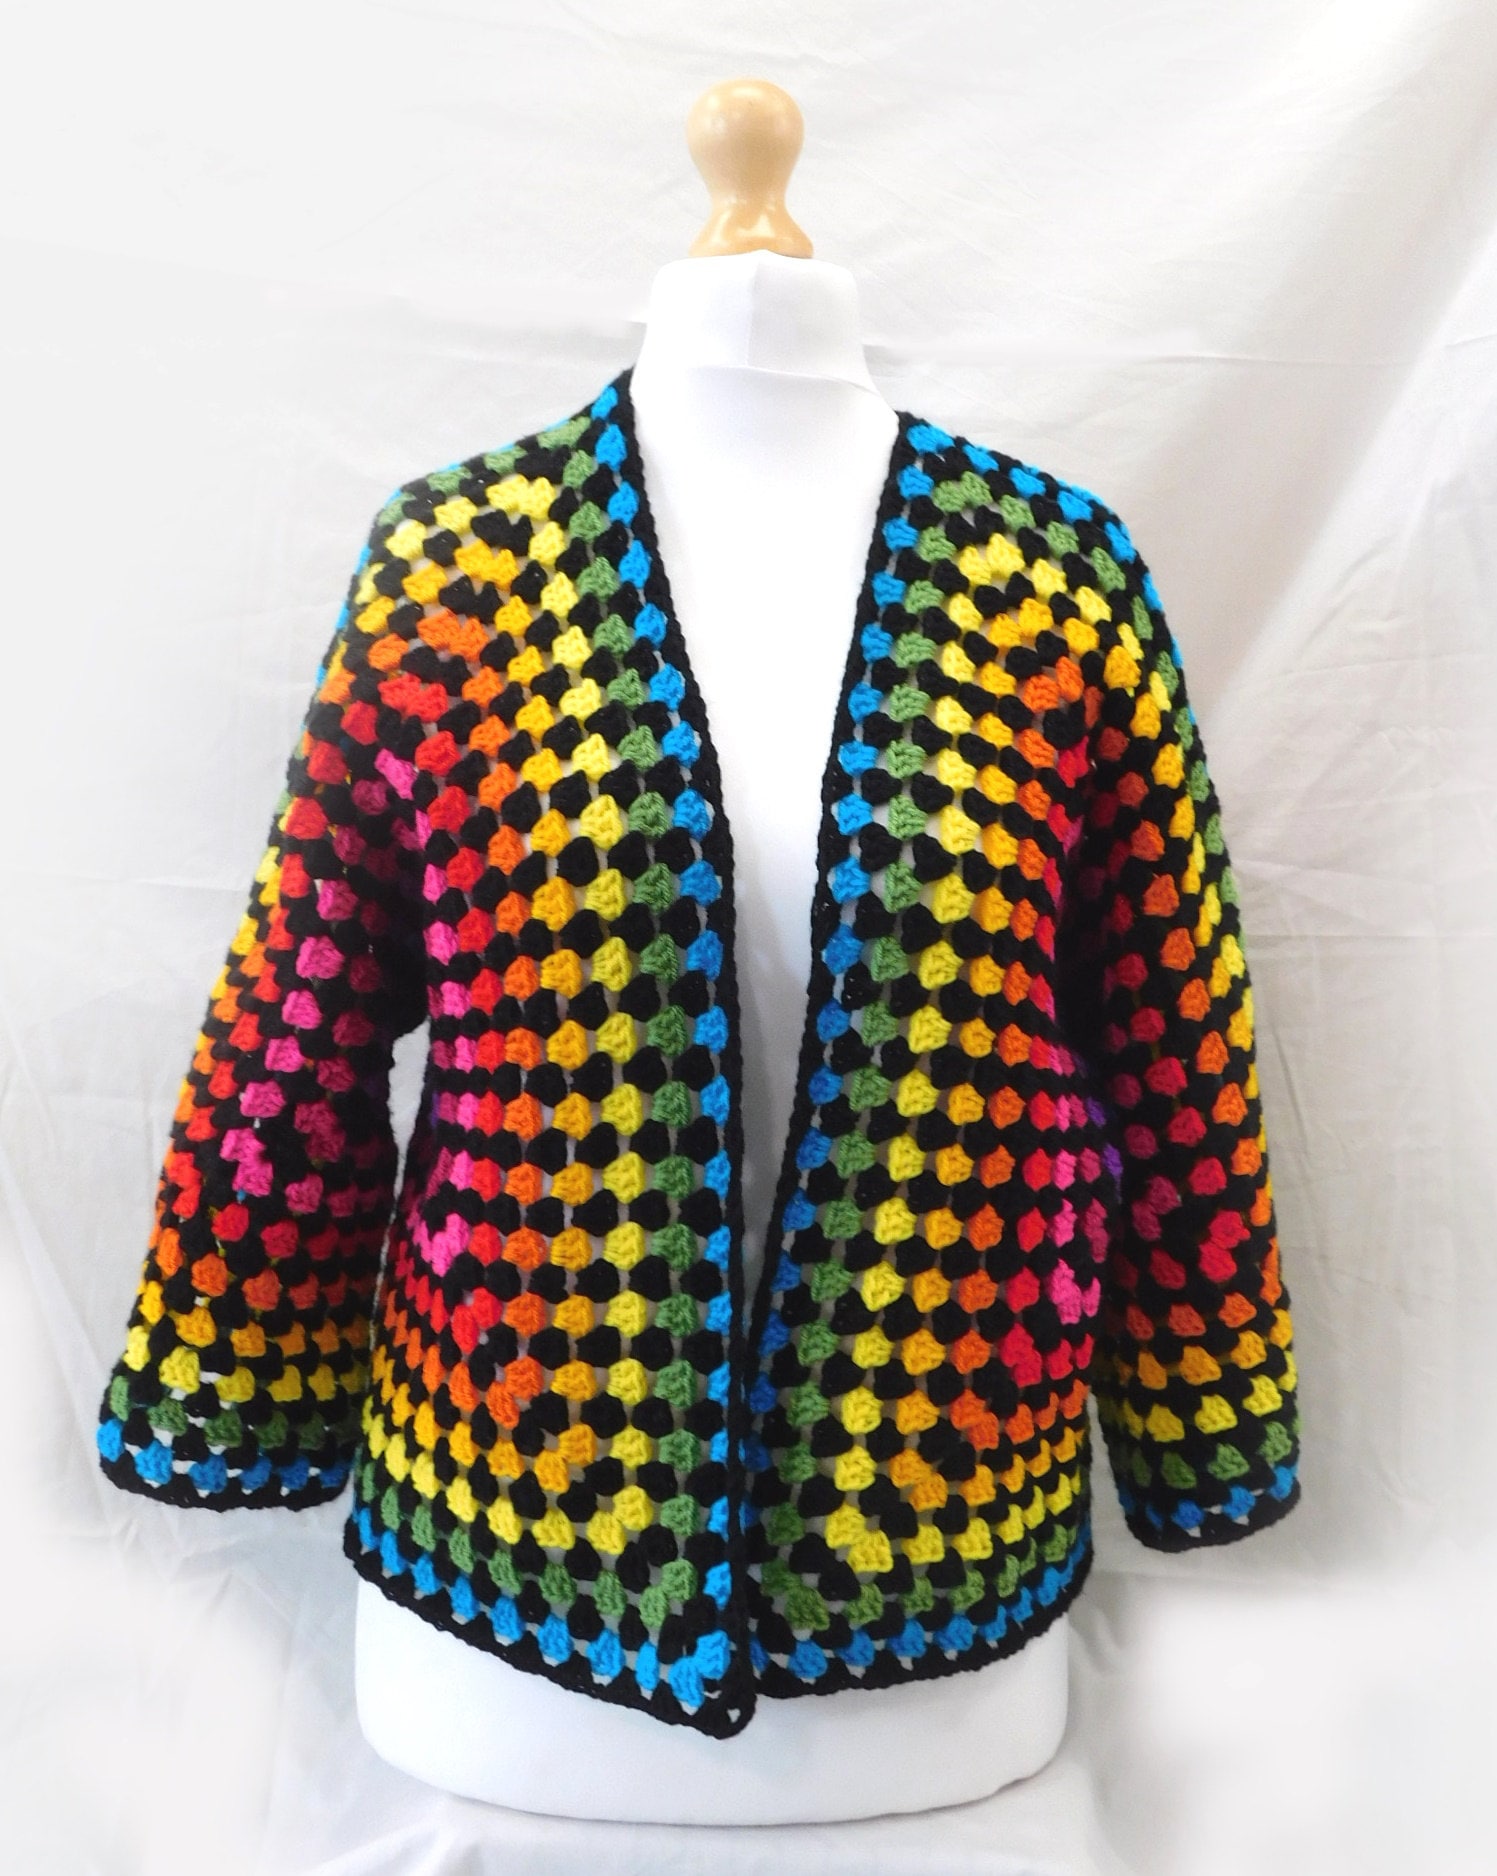
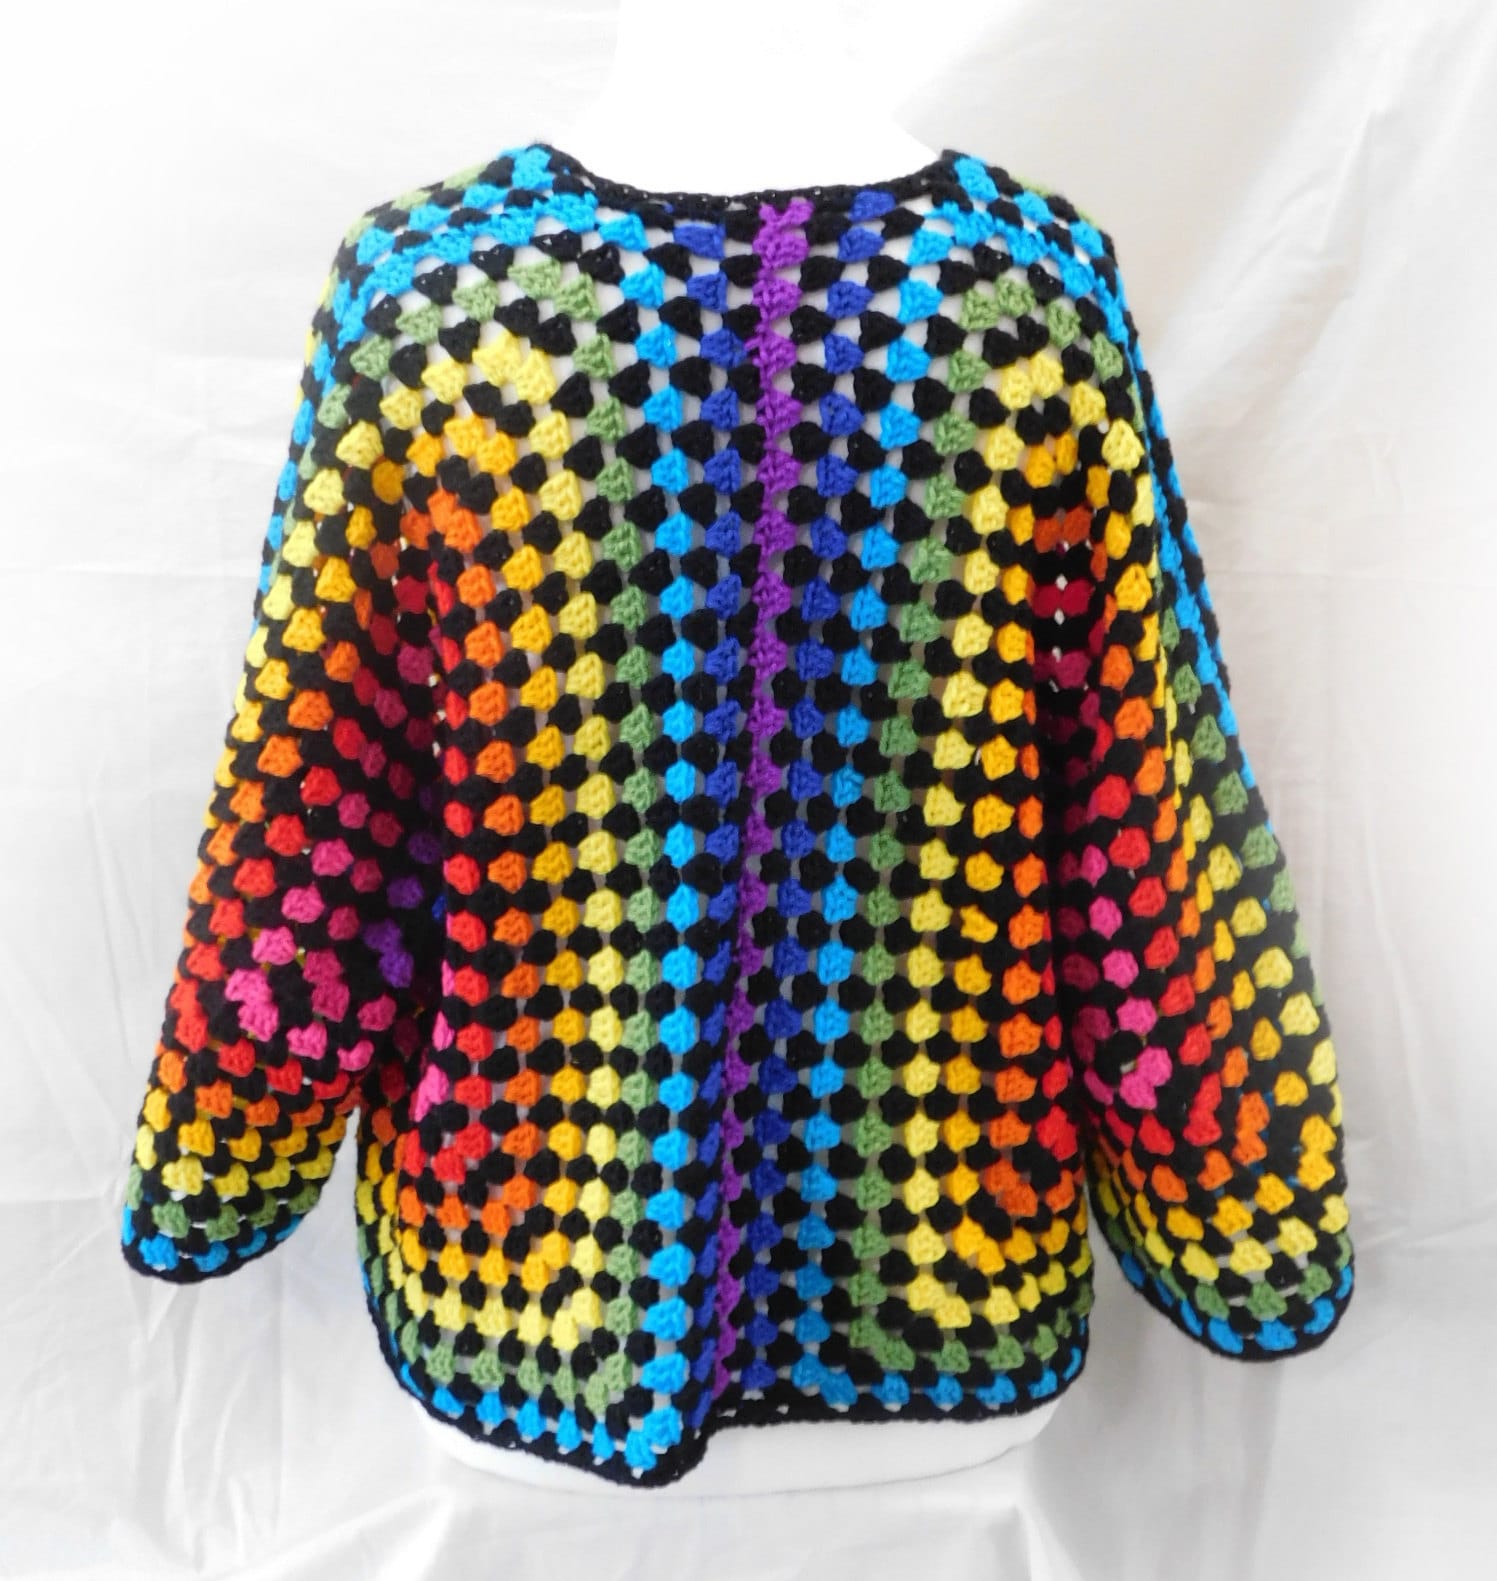
Tools Needed: - 4mm crochet hook. - 350-450g assorted DK yarns. I used a rainbow gradient of colours alternated with black yarn for contrast. You can use 1 colour or variegated yarn for the whole thing if you prefer. - Large needle for weaving in ends &/or sewing up. - Scissors or snips. - Stitch marker if you need to keep place of rounds.
Yarn used for Photographed Sample: Hayfield Bonus DK in the following colours: 2 x balls 965 Black . Size S uses 8 colours, Size M uses 9 colours, Size L (sample shown) uses 1 x ball each of these 11 colours: 824 Azure, 603 Fern Green, 819 Bright Lemon, 577 Cantaloupe, 570 Flame, 554 Tomato, 572 Electric Pink, 568 Grape, 840 Purple, 611 Sapphire Blue, 839 Bottle Green.
Yarn Alternatives: 2 x 100g balls of the main colour & 25-50g approx each of 8/9/11 different colours of Double Knit yarn with a length to weight ratio of around 250-300m per 100g.
Gauge: A 4 round granny square should be 10cm square. Gauge is not overly critical in this design as the cardigan is designed to have an oversize fit, and blocking will correct any misshaped stitches, but if you are aware that you crochet particularly loosely I would suggest using a smaller crochet hook, e.g. 3.5mm, otherwise you may run out of yarn.
Abbreviations: Ch – chain
Dc – double crochet
Ss – slip stitch
Tr – treble crochet
Ch sp – chain space Sk – skip
Prev – previous
St – stitch
Sp – space (refers to the space made by chain stitches).
Rpt – repeat. Used next to marks such as *♥♣♦ to indicate sets of stitches that need to be crocheted more than once to create a pattern.
Pattern:
Chart 1:
Granny Square Hexagons (make 2 identical).
The hexagons are worked in the round in a similar way to a standard 4 sided Granny Square.
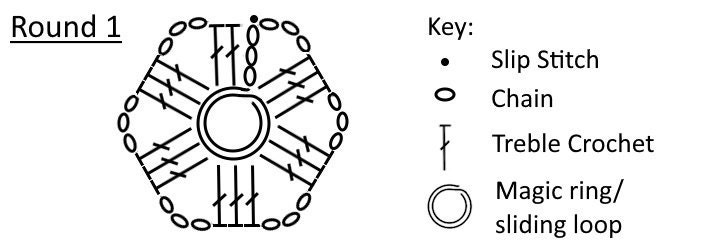
To start: make a magic ring/sliding loop or chain 8 and join the last chain to the first with a slip stitch.
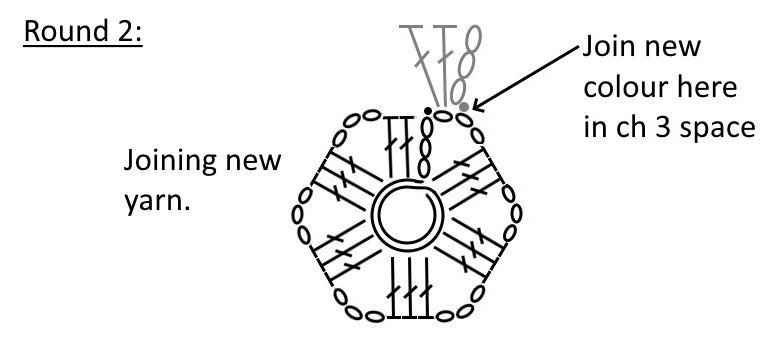
Round 1: Chain 3 (counts as 1st treble), 2 trebles, chain 2, *3 tr, ch 2*, repeat from * to * 4 more times. Slip stitch into the top of the chain 3 at the start of the round. Note: If you are using multiple colours change colour here ready for the next round. After sl sl into the chain 3 cut your yarn leaving a 10cm tail or enough to weave in the end later. Then take your new colour and join with a slip stitch into the ch 2 space.
Round 2: Chain 3 (counts as 1st tr), 2 tr, ch 3, 3tr in the ch 2 sp, ch 1, * 3tr, ch 3, 3tr* in the next ch 2 sp, ch 1, repeat from * to * 4 more times. Sl st in the top of the ch 3 at the beginning of the round. After sl sl into the chain 3 cut your yarn leaving a 10cm tail or enough to weave in the end later. Then take your new colour and join with a slip stitch into the ch 2.
Round 3: Ch 3 (counts as 1st tr) 2 tr, ch 3, 3tr into the ch sp, ch 1, 3 tr in next ch 1 sp, ch 1, * 3tr, ch 3, 3tr in ch 3 sp, ch 1, 3 tr in next ch 1 sp, ch 1*, repeat from * to * 4 more times. Sl st in the top of the ch 3 at the beginning of the round. After sl sl into the chain 3 cut your yarn leaving a 10cm tail or enough to weave in the end later. Then take your new colour and join with a slip stitch into the ch 3 space.
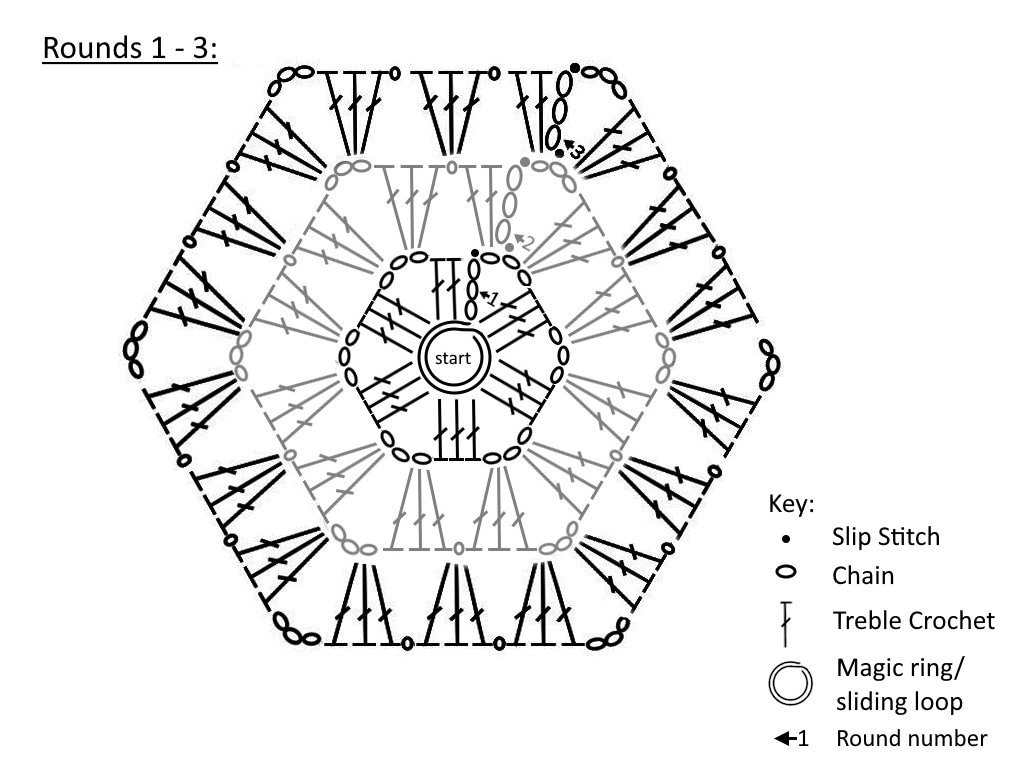
All following rounds: You will be repeating the same stitch sequence as round 3for every round. Always starting in the same place with ch 3 then 2 tr, ch 3, 3 tr in the first corner, 3 tr then ch 1 in every chain 1 space, and 3tr, ch 3, 3tr in every corner ch 3 space.
Keep making rounds until you get your desired size (see chart 1 for number of rounds). Use a sl st in the beginning ch 3 to fasten off your last round and cut the yarn leaving a long enough tail to sew in.
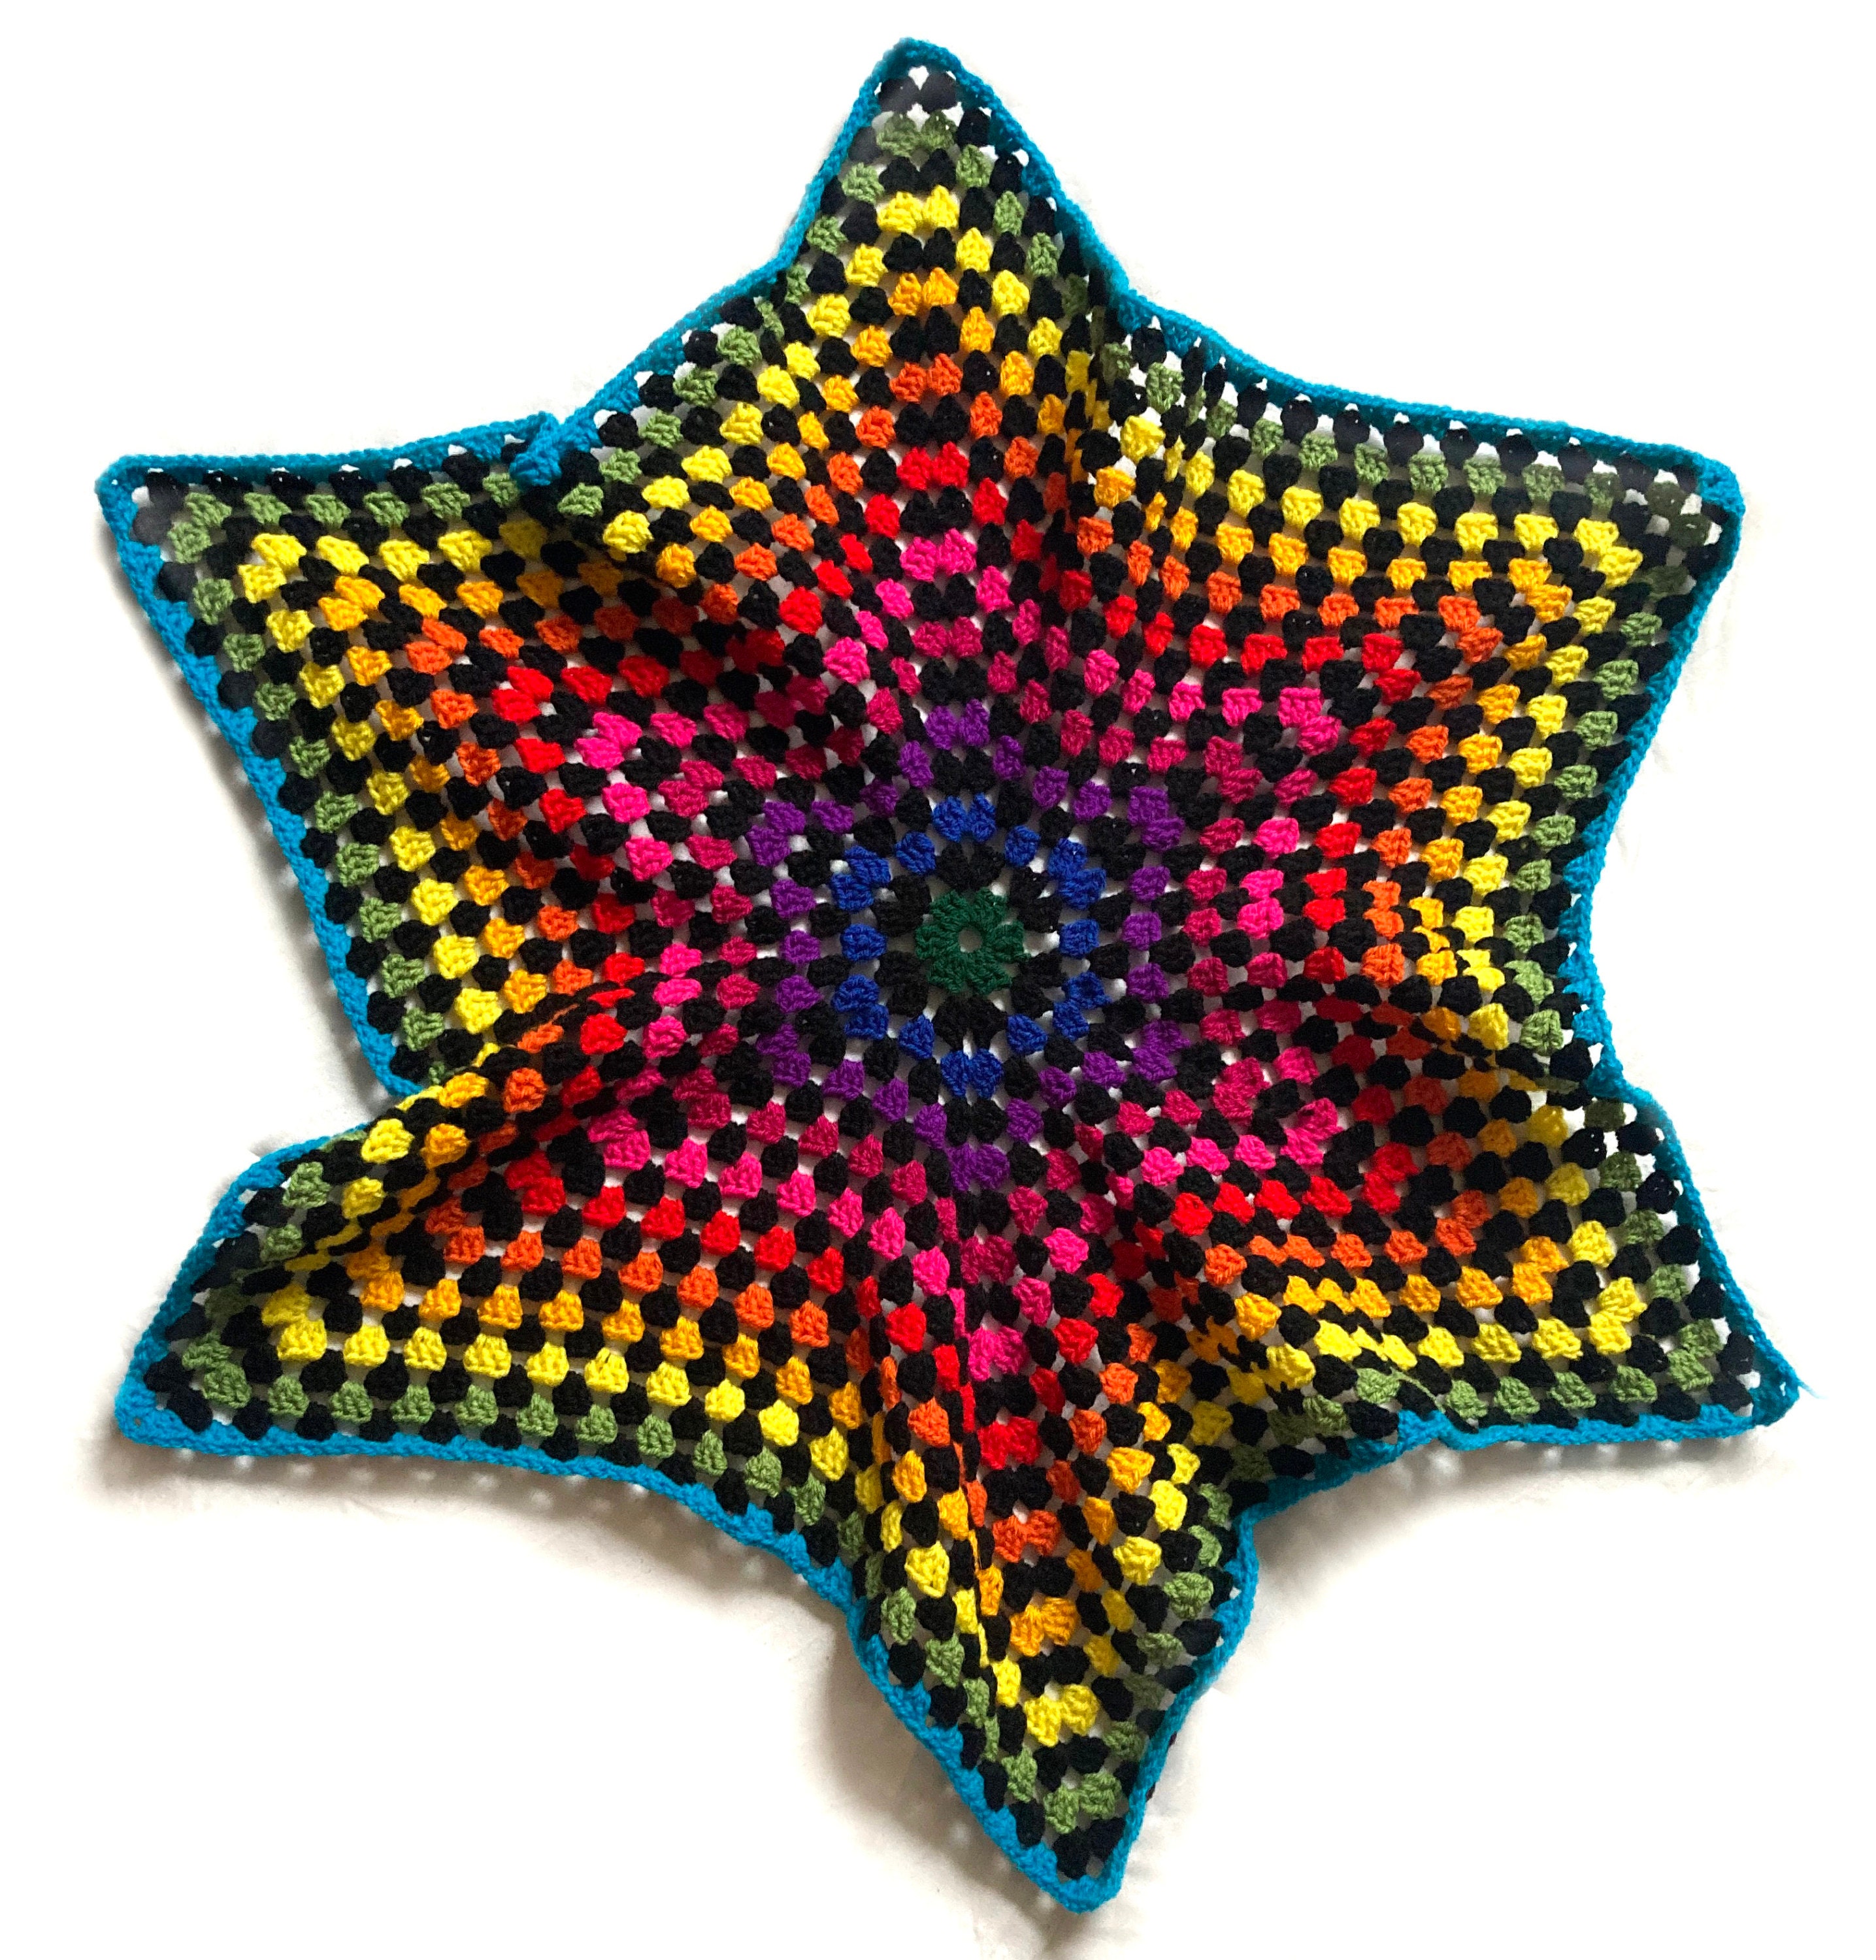
Your hexagons will not lay flat like a standard crochet hexagon would. If you try to lay it flat it will look something like this (see below).
Make a second hexagon of the same size using the same colour combination as the first hexi.
Attaching the 2 sides of the cardigan: It will help to weave all ends before you do this.
How to lay each hexagon flat: lay your work in a star shape like the image above. Fold the bottom point up to meet the top point. Holding these 2 points together, smooth your work flat from side to side, lining up each of the other 4 points so that 2 of them sit directly above the one below it. This will make an L shape.
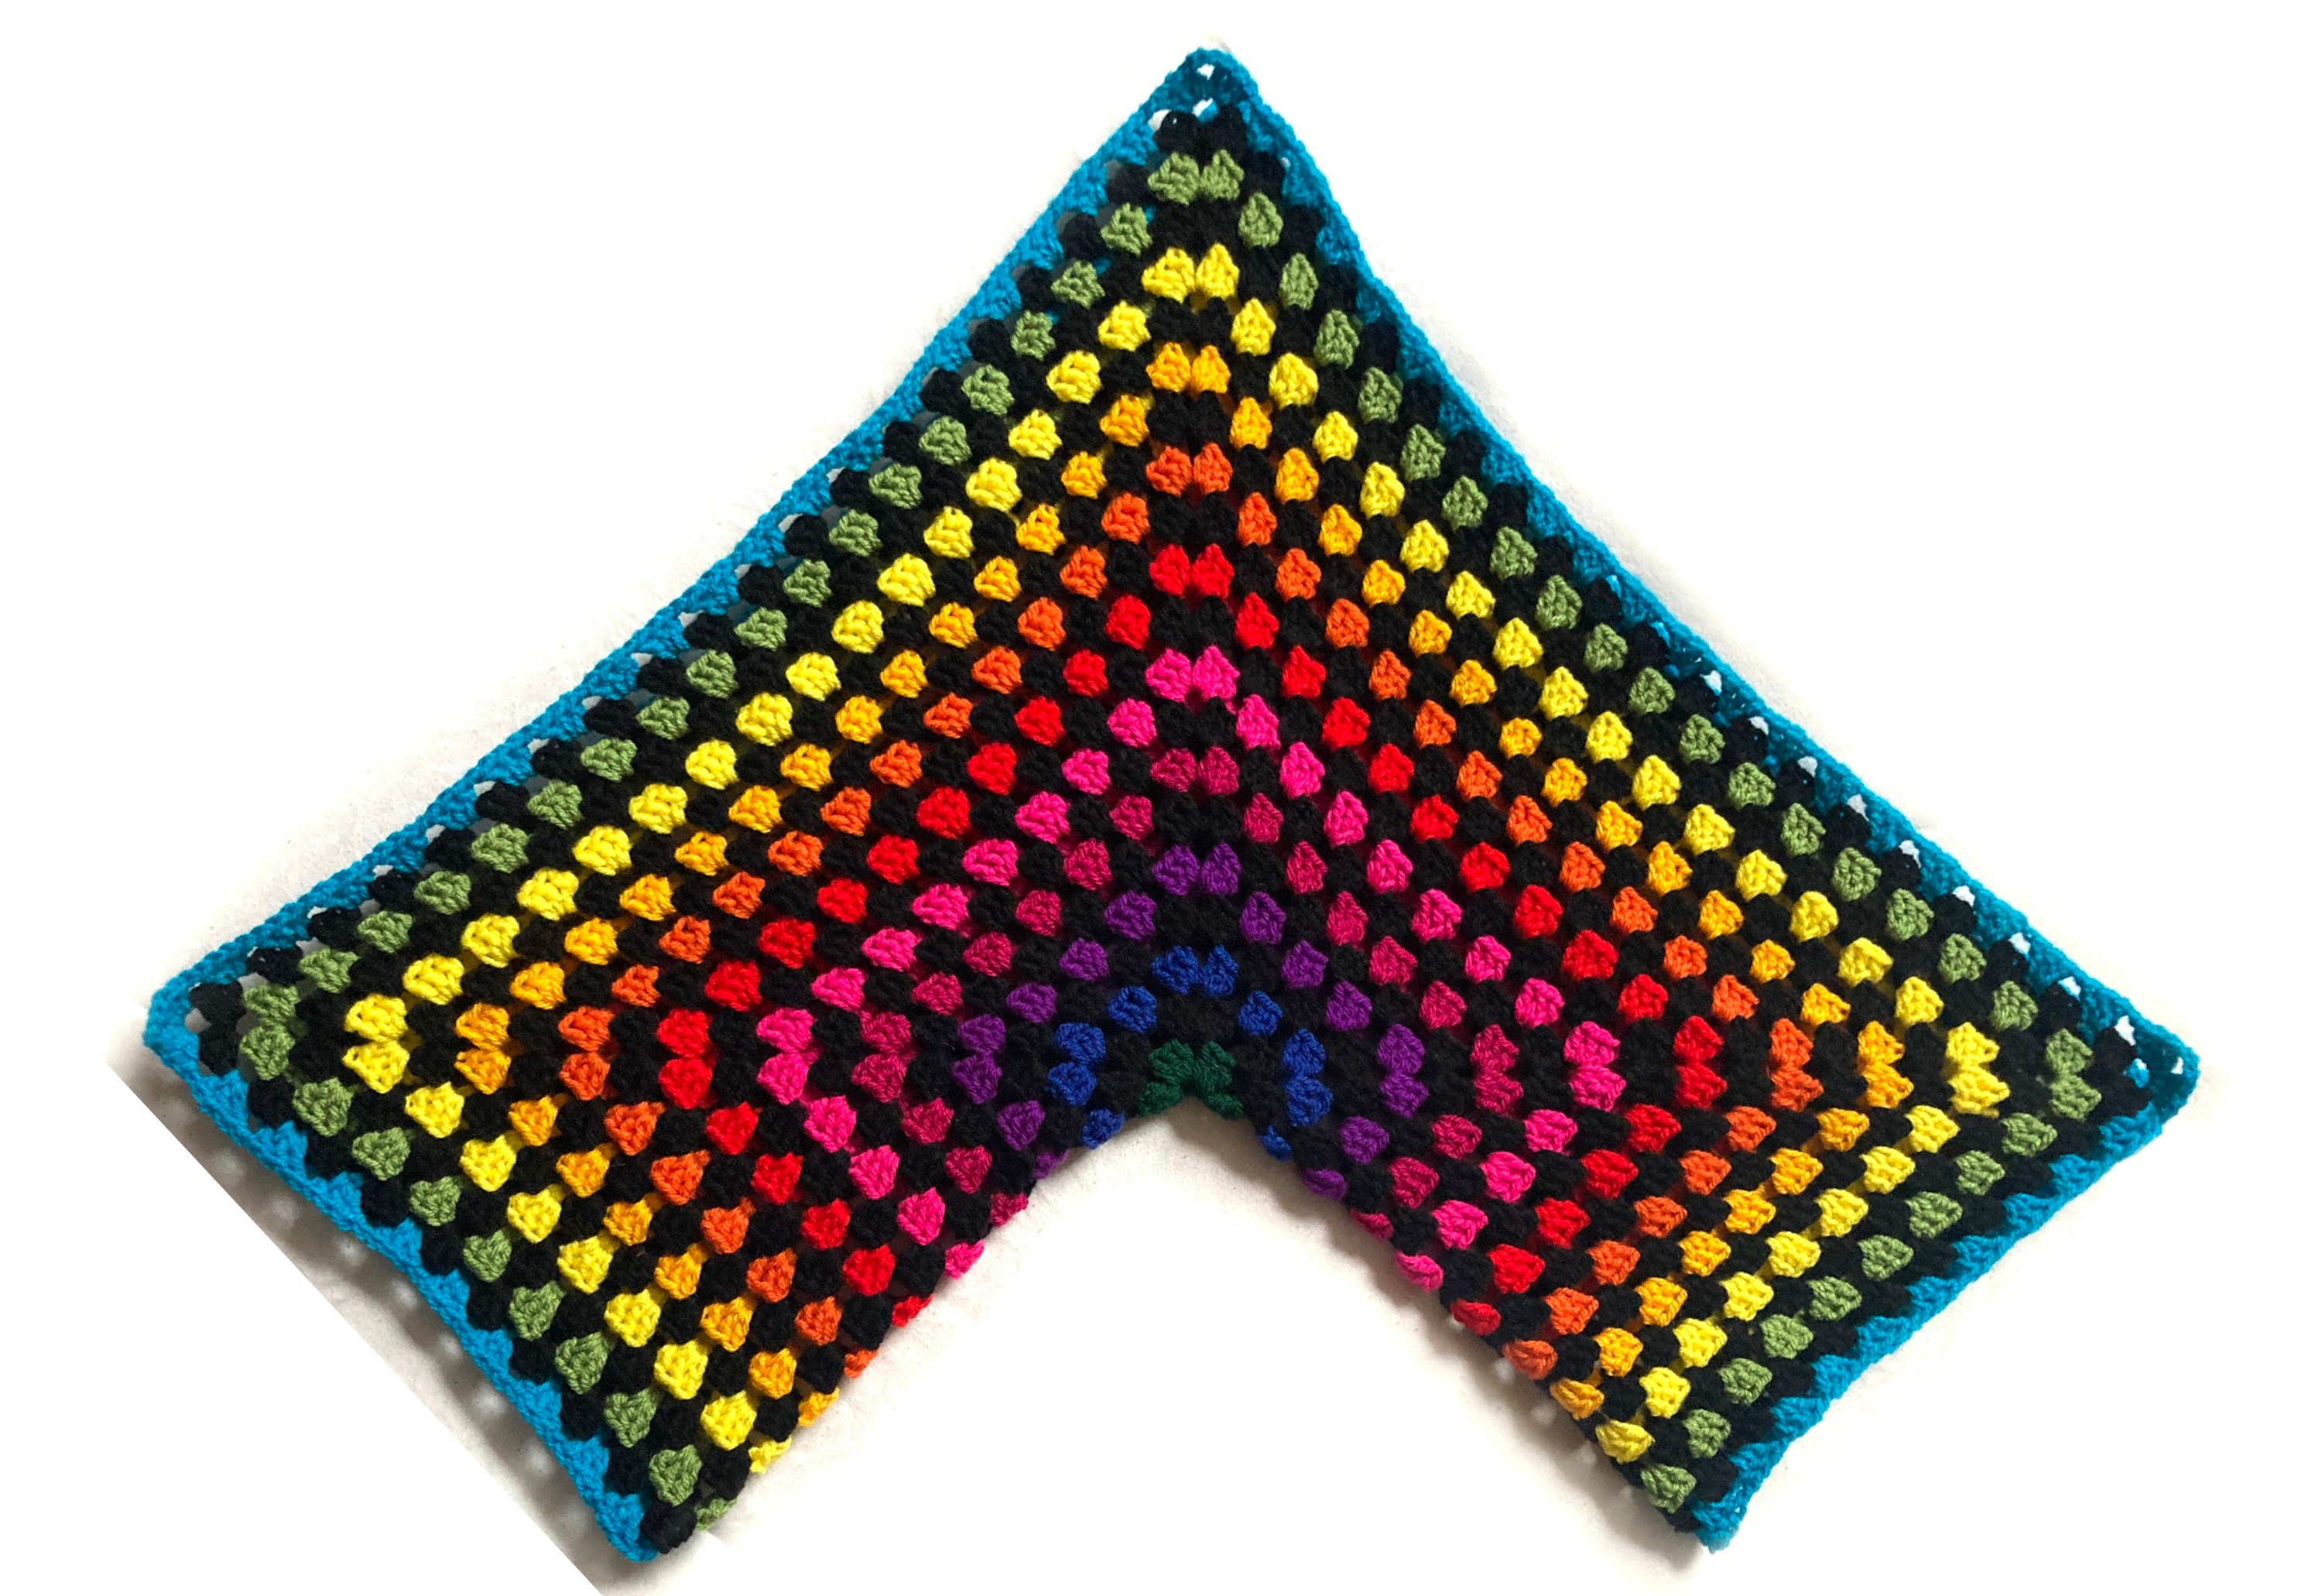
You will now have 2 granny hexagons that look something like this:

Then follow the steps below to join and finish your cardigan:
The two hexagons will now be referred to as left and right. The top layer of your folded hexies will be the back of your cardigan, and the bottom layer will be the front opening.
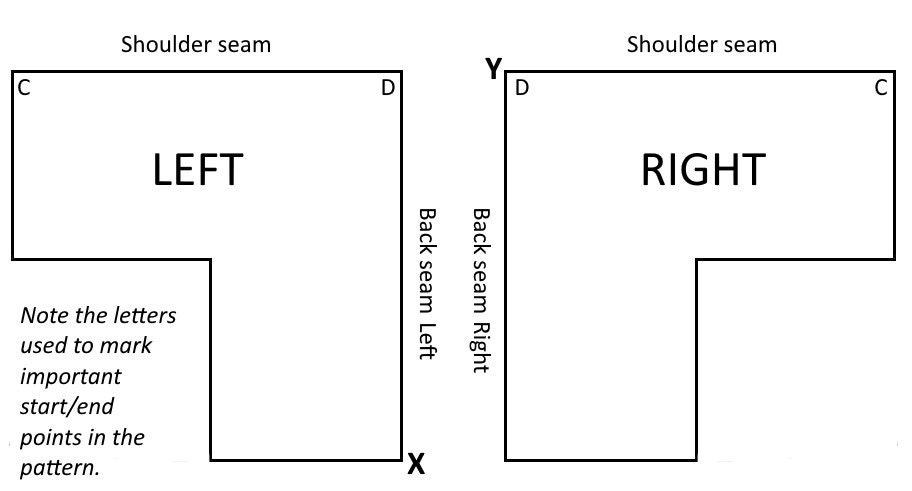
Work the along the Left back seam first.
Row 1: join your yarn to the ch 3 which forms the corner marked X on the diagram above with a slip stitch. Chain 3 (this counts as 1 treble). ♥ In the next chain space treble 3, chain 1 ♥. Repeat from ♥ to ♥ along the edge until you reach the corner. Chain 3 (counts as 1 tr) then attach your yarn to the ch 3 that forms the corner below with a slip stitch. Cut yarn leaving a tail to sew in and return to the corner marked X.
Row 2: join your yarn to the top of the ch 3 which forms the first treble above the corner marked X on the diagram above with a slip stitch. Treble 1 into the same ch sp. ♣ Chain 1, 3tr into each ch sp ♣ along the row until you reach the corner. Make 1 tr into the ch 3 which forms the final tr on the row below, then ch 3 (counts as 1 tr) and attach your yarn to the same space with a slip stitch. Cut yarn leaving a tail to sew in and return to the corner marked X.
Row 3: repeat as per row 1.
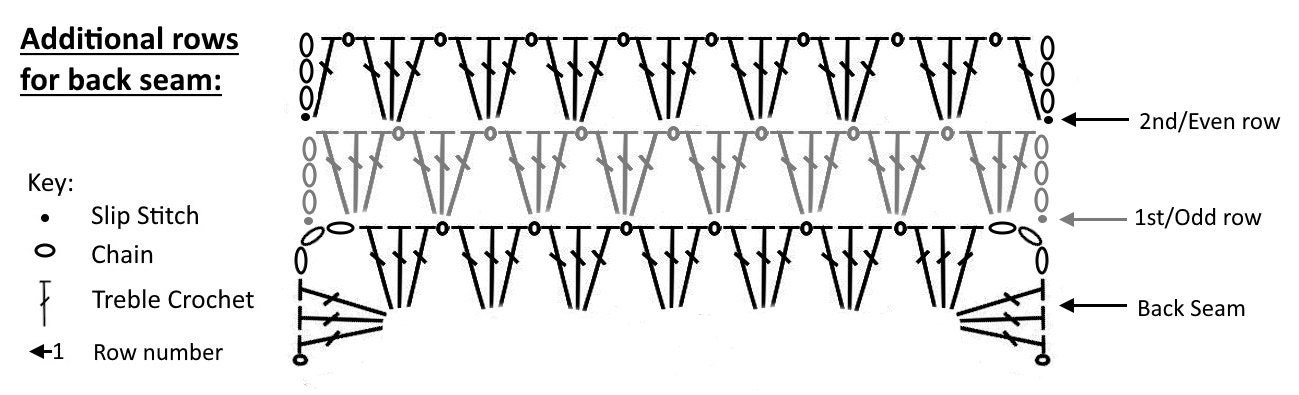
Now work the Right back seam, starting at the point marked Y on the diagram on the previous page. Note: This side has 4 rows, instead of 3.
Row 1: join your yarn to the ch 3 which forms the corner marked Y on the diagram above with a slip stitch. Chain 3 (this counts as 1 treble). ♥ In the next chain space treble 3, chain 1 ♥. Repeat from ♥ to ♥ along the edge until you reach the corner. Chain 3 (counts as 1 tr) then attach your yarn to the ch 3 that forms the corner below with a slip stitch. Cut yarn leaving a tail to sew in and return to the corner marked Y.
Row 2: join your yarn to the top of the ch 3 which forms the first treble above the corner marked Y on the diagram above with a slip stitch. Treble 1 into the same ch sp. ♣ Chain 1, 3tr into each ch sp ♣ along the row until you reach the corner. Make 1 tr into the ch 3 which forms the final tr on the row below, then ch 3 (counts as 1 tr) and attach your yarn to the same space with a slip stitch. Cut yarn leaving a tail to sew in and return to the corner marked Y.
Row 3: repeat as per row 1.
Row 4: Repeat as per row 2, but when you reach the end do not cut the yarn.
Joining the two sides together: Lay your 2 hexis with the additional rows on top of each other with the right sides (the sides that will be facing outwards) together. Line row 3 of the Left Back up with row 4 of the right back and using the same yarn as for row 4, join the 2 together. I prefer to use the crochet hook to make a double crochet seam (see Techniques) but you may prefer to sew them using a wool needle. You will now have 7 rows of granny trebles in the back between the left & right hexies.

Joining the shoulder seams: Use same method for both sides.
Starting at the cuff (marked as C) and ending at the neck (marked as D), join your yarn and crochet 1 row of granny trebles as per row 1 of the back seam instructions. When you reach the neck do not cut the yarn, but place the back and front shoulder seams together with with the right sides (the sides that will be facing outwards) together. Continue in the same yarn to join the 2 together with a double crochet seam (see Techniques) or sew the seam using a wool needle, moving from D back down to C.
Finishing:
To finish you are going to add 1 more round of granny treble clusters to each cuff and all the way around the neck/chest opening/bottom of the body.
The diagram below will give you a guide of the direction of work and where to start/end to best hide the joined yarn.
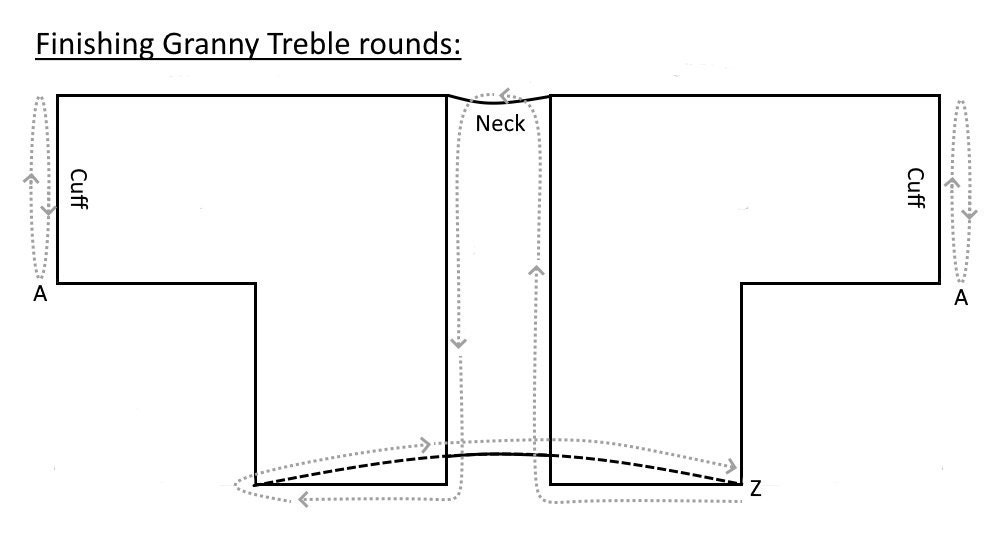
Cuffs: For each cuff, start at point A in a chain space, join yarn with a slip stitch, chain 3 (counts as 1st treble) then make 2 more tr into same space. ♦ Ch 1, 3tr into next ch sp ♦, rpt from ♦ to ♦ all the way around until you reach your starting point, ch 1 then join your yarn to the top of the ch 3 with a sl st. Cut yarn, leaving a tail to weave in.
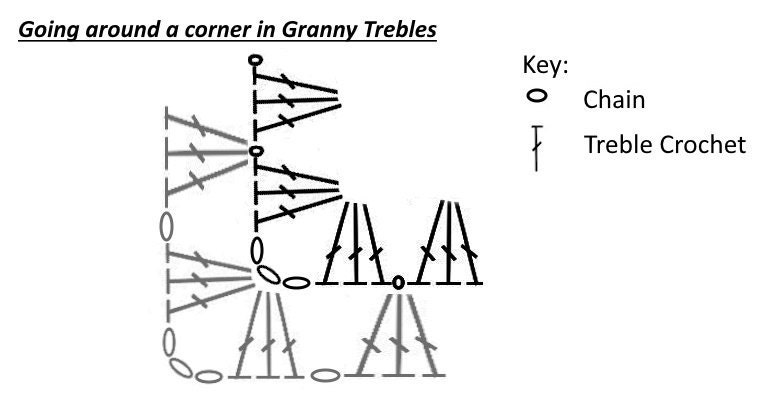
Main body of cardigan: Start at point Z in a chain space, join yarn with a slip stitch, chain 3 (counts as 1st treble) then make 2 more tr into same space. ♦ Ch 1, 3tr into next ch sp ♦, rpt from ♦ to ♦ until you reach your first corner. ♠ Ch 1, Tr 3, Ch 3 to go around the corner and tr 3 in the same space ♠ before continuing ♦ to ♦ all the way up the right side of the opening, around the neck and down the left side until the next corner. Repeat ♠ to ♠ then continue from ♦ to ♦ all the way around the back of the cardigan until you reach point Z. Finish with a ch 1 then join your yarn to the top of the starting ch 3 with a sl st. Cut yarn, leaving a tail to weave in.
Weave in all ends and trim them.
I like to block my work to define the stitches. See Techniques section to find out how.
Techniques:
Magic Ring/Sliding Loop: Wrap yarn two times around left forefinger to form a ring. Holding yarn tail between left thumb and middle finger, insert hook into ring, grab the working end of the yarn, and pull it through the ring. Chain 3 (or number of times to suit 1st stitch). Drop ring from finger. Work additional stitches into ring to complete first round (For this pattern it will be 2tr, ch 3, ♥ 3tr, ch 3 ♥ five times, sl st, as per round 1 instructions). Before moving on to 2nd round gently pull the beginning tail to partially cinch up the ring. You will find one of the 2 strands tightens and one does not. Pull the tightened thread to cinch up the other strand and gently pull the tail again to close the ring.
Double Crochet seam: Work a row of double crochet which goes through both sides/layers along the edge. Work one dc per chain or treble, being careful to keep the tension the same as the rest of your work so that the joining seam does not pucker or pull. Join the 2 pieces with the right sides together so that the ridge is not visible from the outside.
Blocking : To block your shawl, pin it out on a foam board (I use children play mats), and then mist with warm water. The warm water relaxes the fibres, so they can be stretched into place and will hold these new 'positions' once dry.
Fasten off : end the round by cutting the yarn and pulling the tail through the last loop left on the hook.